With 2 billion users and 300 hours of video content being uploaded every minute, YouTube isn’t just a website—it’s a search engine. With so much content being pushed out, a great way to stand out (and increase your click rate) is through custom video thumbnails. But what is the perfect YouTube thumbnail size?
There are a lot of factors that go into earning views. Apart from the obvious factors, like the quality of the content and promotional tactics, a key factor is presentation.
And a critical element of presentation is having captivating and custom thumbnails.
Thumbnails don’t just grab attention-they also encourage users to click on your video over the dozens of others competing for attention. Pairing a well-designed thumbnail with strategies like purchasing engagement boosts can further amplify results. For instance, some creators opt to buy YouTube likes to complement their content, as an increased number of likes can make videos appear more credible and popular, enticing even more viewers.
To help you get them right, in this article, we’ll discuss:
- The recommended YouTube thumbnail size or dimensions
- Why you should create custom thumbnails in the first place (and how to create one with readymade templates)
- Expert graphic design tips to help you design eye-catching thumbnails
- A step-by-step process to adding a thumbnail image to your YouTube videos
Let’s dive in.
Table of Contents
So, What’s the Perfect YouTube Thumbnail Size?
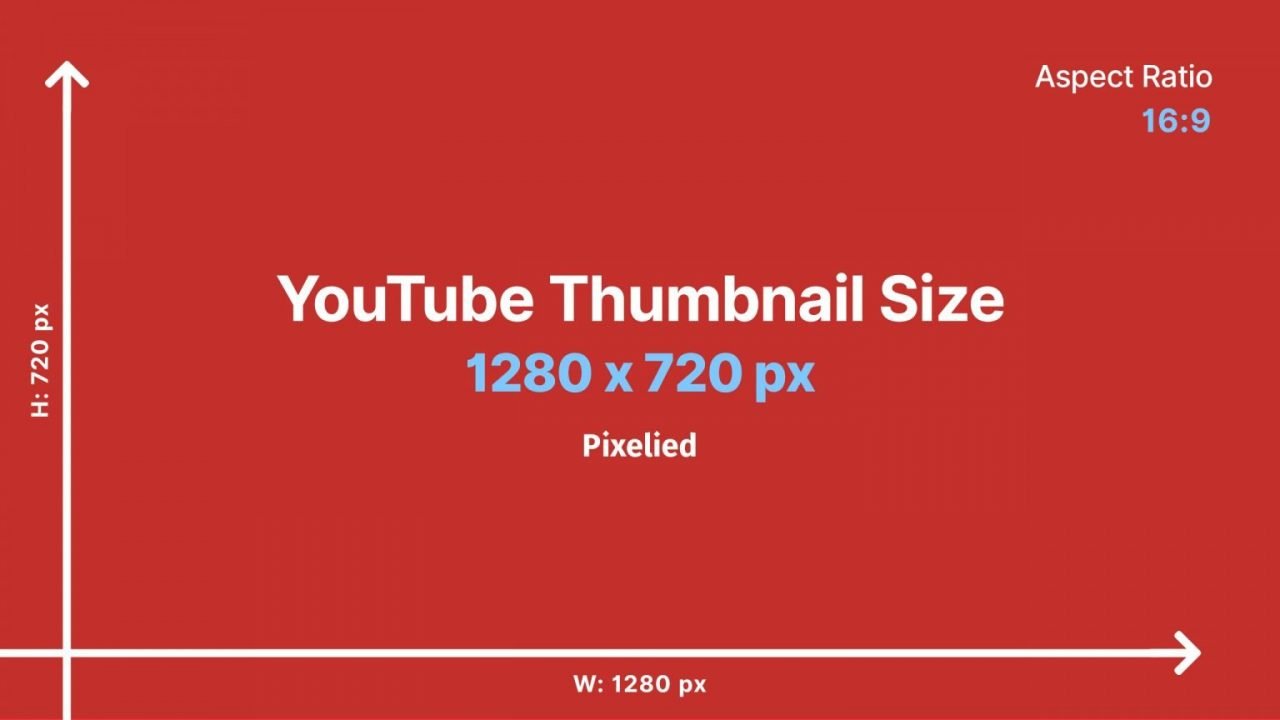
The ideal YouTube thumbnail size is 1280 x 720 pixels, with a minimum width of 640px, according to Google’s official recommendations. YouTube won’t accept files that don’t meet these requirements.
In addition to the above, the video’s thumbnail should also:
- Have an aspect ratio of 16:9 (as it’s common in YouTube players)
- Not exceed more than 2MB in file size (you can use image size compression tools for this purpose)
- Be in the JPG, PNG, or GIF image format (no other file type will be accepted)
While it’s certainly important to focus on the creative aspects of these previews, if you don’t get the YouTube thumbnail size right, it won’t matter much.
It is important to note that the thumbnail dimensions are different from that of the YouTube video size which is 1920 x 1080 px.
Why Even Bother Creating YouTube Thumbnails?
We’re sure you already know this, but YouTube automatically sets a thumbnail, which is actually a screenshot/still image of a section in your video.
If that’s the case—why go through all that trouble of designing a custom video thumbnail (while making sure that you stick to a certain image size)?

Well, this goes back to what we highlighted earlier—the need to cut through the noise and stand out from millions of videos.
To be specific, having a custom thumbnail can help:
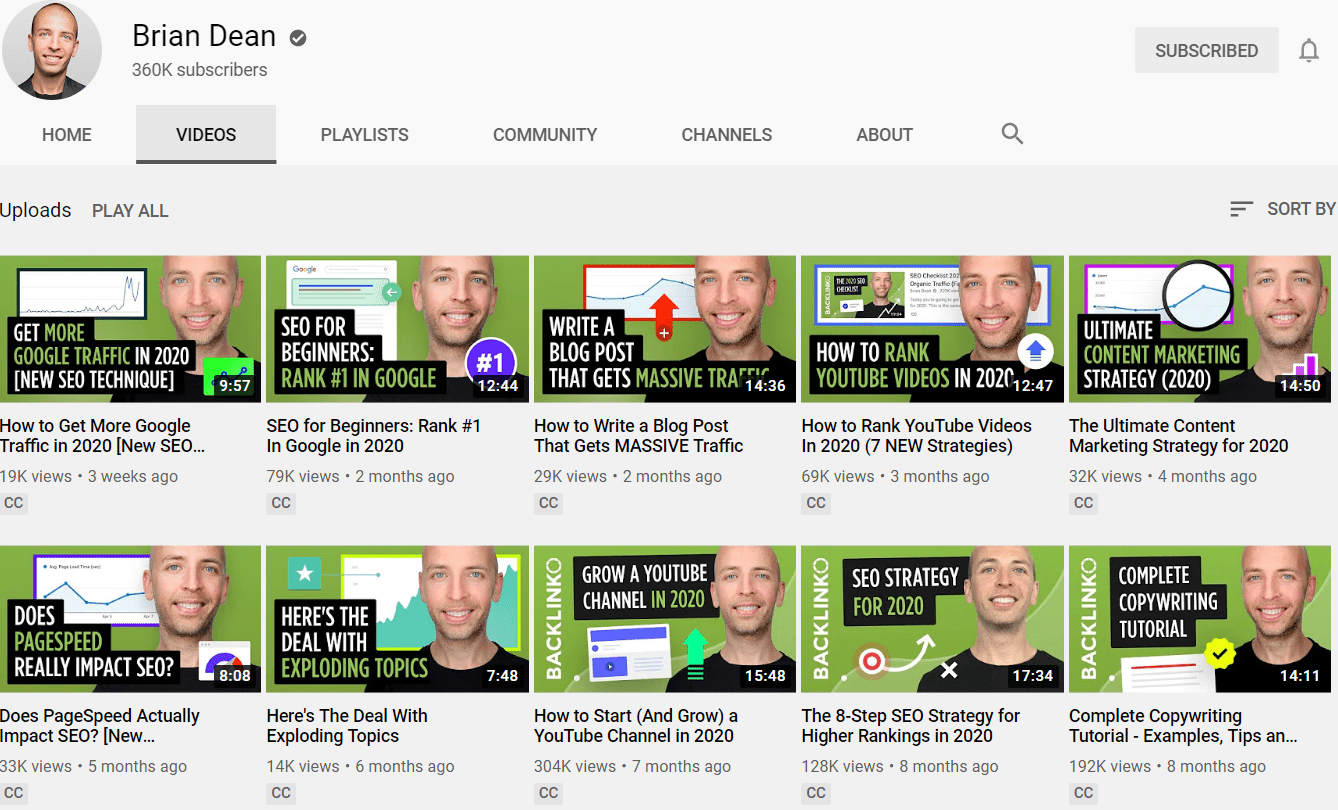
- Increase Views – the first thing that potential viewers see is the thumbnail. By making it captivating, your chances of higher click-through rates and views can increase. Since viewers are now generally more selective of what they click on, you probably won’t go anywhere with a generic preview image.
- Make Your Video Shareable – an alluring thumbnail can also make your video more shareable on social media and other platforms, driving even more people to click on it.
How to Create a Custom YouTube Thumbnail in Less Than 10 Minutes
Now that we’ve gone over the ideal YouTube thumbnail dimensions and why you need to create one, how do you create one?
Check out this video to learn how to create YouTube thumbnails that will get you more views and make you stand out from all the rest!
You could design a custom thumbnail image from scratch on Adobe Photoshop.
But what if you don’t know how to use Photoshop or simply don’t have the time?
Well, you can always use Pixelied—an easy to use and cost-effective alternative to Photoshop, Canva, Snappa, and other popular graphic design tools.
With our graphic design tool, it’s possible to create a thumbnail in less than 10 minutes.
Just follow these steps:
Step 1: Open Pixelied’s Fast & Easy Editor
To start designing click-worthy YouTube thumbnails, simply go to our free thumbnail editor.
On the left panel, you can go through hundreds of converting YouTube thumbnail templates that are ready to use and customize.

Step 2: Select a YouTube Thumbnail Template

Hers’s where the fun part begins.
One of the key offerings of Pixelied is its vast library of ready-to-use and fully-customizable templates for Facebook, Instagram, LinkedIn, Twitch, SoundCloud, and of course, YouTube.
This means you no longer have to worry about getting the YouTube thumbnail size right.
In addition to thumbnails, you can find a template and ideas for YouTube channel art and end screen (in the ideal size).
Step 3: Customize it to Your Liking
Once you select a template that you fancy from the list, it’ll load onto the editor where you can customize it however you like.
This is what it looks like:
![]()
Here’s what you can do with Pixelied’s editor:
- Use Royalty-Free Stock Images – you can replace the images in your templates with other royalty-free images sourced from Unsplash. Simply select “Images” from the toolbar and browse/use the images right there on the tool (no need to switch tabs).
- Add Custom Text – you can edit and manipulate the text however you want. Select from over 900 Google fonts to get the look you’re after.
- Use Exciting Design Elements and Icons – want to add a creative touch to your thumbnail? Use a design element or an icon (they’re free).
- Upload Files – you can also upload and use your own files (SVG and vectors included). These can be your portraits, logos, or literally anything else.
Additionally, Pixelied lets you add borders and shadows to individual elements. You can also decide the placement of layers (in the front, behind, etc.).
When you’re done, click on the download button at the top-right corner.
To learn more, you can check out our in-depth post on using Pixelied to enhance your social media design.
7 Essential Tips for Creating Attention-Grabbing YouTube Thumbnails
All things considered, creating a YouTube thumbnail is a piece of cake.
However, creating a GREAT YouTube thumbnail can be a bit tricky.
Don’t worry though—by sticking to these 7 thumbnail best practices, you’ll be alright:
1. Make Your Thumbnail Relevant
Let’s start off with the basics.
Your YouTube thumbnail should be 100% relevant to the actual content of your video.
You can make it intriguing and mysterious, as long as they’re somehow related to the actual substance of your video.
But whatever you do—avoid clickbait. In the context of thumbnails, it means:
- Writing grand claims
- Using inappropriate content
- Adding unrealistic images
Here’s exhibit A:

I’m no aviation experts, but that can’t be right.
You might be wondering—“But that video has 1.6M views! Isn’t that good?”
YouTube doesn’t only look at the total number of views. It also considers a metric known as audience retention, which basically tells you how much of the video your viewers actually watched.
If most of your viewers didn’t even make it to half of the video, what’s the point?
And even if you do retain a significant percentage of your audience, you don’t want to use clickbait-y thumbnails and video titles, as it will affect your brand in the long-run.
Your thumbnail should be of high quality, captivating, and relevant.
2. Select Your Image Carefully
This is somewhat related to the previous point.
You can’t just add any old image to your YouTube thumbnail design.
Here are your options:
- Select a relevant royalty-free stock image
- Get some pictures of yourself and add some text/icons/images to make it look better
- Use custom illustrations
Here’s an example:

Vsauce (Michael Stevens) sometimes uses his interesting and often mysterious portraits for his thumbnails.
In the end, the image should help your thumbnail stand out and blend properly with the other design elements.
Just make sure that it fits within the YouTube thumbnail size and doesn’t look bizarre.
3. Choose Contrasting Colors to Stand Out
What do the best YouTube thumbnails have in common?
Well, a lot of things. But one major quality is contrast.
By using the right colors for the background, typography, images, and other design elements and making sure that they complement one another with the right level of contrast, you can turn any thumbnail into a magnet for impressions and clicks.
Here’s a small demonstration:

As you can see, if the color of the different elements (in this case, the background and the text) don’t stand out, the viewers might not be able to distinguish between them.
Here’s a good example:

The vibrant colors of the image and the typography are all spot-on.
Now here’s a bad example (i.e. what not to do):

You might be able to comfortably read that on a large screen, but on smaller devices, like smartphones, some people would need to squint.
4. Summarize Your Video Title
This isn’t necessary, but it certainly can go a long way in making your video’s thumbnail more interesting.
If you can, summarize your video’s title (or at least the key selling points) and add it as copy to your thumbnail.
Your goal is to have the least amount of words on the image as possible, like so:

If you have a long title, don’t make the mistake of using it word-for-word as the copy of the thumbnail.
5. Leverage Whitespace
You don’t have to fill the entire 1280px X 720px space with design elements.
In fact, I advise against it.
To give your images a clean, professional look, make sure that you have a good amount of whitespace.
Here’s a nice example:

Keep in mind that “whitespace” in this context doesn’t necessarily have to be white. It’s just a loose term that’s used to describe breathing room.
6. Aim for Consistency
This is another tip that’s optional.
However, it can help make your YouTube channel look more professional and coherent: Aiming for consistency when designing your YouTube thumbnails.
This could include:
- Typography
- Color scheme
- Sticking to a particular art style or images
Doing so can help you establish a brand for yourself and make your videos more recognizable over time.
7. Make Sure to Follow Community Guidelines
Last but not least, besides the YouTube thumbnail size and the best practices, make sure that you follow the community guidelines set by Google.
According to these guidelines, your thumbnails must not include:
- Hate speech
- Nudity or provocative substance
- Dangerous or harmful content
- Violence
If you don’t abide by the rules, YouTube will reject your thumbnail.
If this happens repeatedly, you might even lose your custom thumbnail privileges (yup, it’s a thing) or even have your YouTube account terminated.
How to Add Thumbnails to Your YouTube Video
Now that you’ve created your custom YouTube thumbnail image, it’s time to show it to the world.
To upload custom thumbnails, follow these steps (for desktop):
- Head over to YouTube Studio (if you’re already logged in, this link should take you to the YouTube Studio dashboard of your channel).
- In YouTube Studio, select “Videos” from the menu you see on the left.

- Scroll down to the video you want to add a thumbnail to, hover your cursor over it, and click on the editing icon.

- Under “Thumbnail,” click on “Upload thumbnail” to select the image file from your device (make sure it does not exceed the maximum file size limit).

- Once it finishes uploading, and everything seems alright, click on “Save” in the top right corner.
And that’s it.
Wrapping it Up
Getting the ideal YouTube thumbnail size is just one piece of the puzzle.
The hard part lies in rolling your sleeves up and actually designing the image.
But with the right tool and all those tips we went through at your disposal, creating YouTube thumbnails should be a breeze.


Here is another good option with a deeper dive into the nuts and bolts of creating a YouTube thumbnail
Thank you for reading our in depth guide on the perfect YouTube Thumbnail Size