
With over 1.9 million Amazon sellers and 12 million product categories listed on Amazon, it can be hard to compete in the eCommerce marketplace. However, by building your store with a seamless user experience in mind, you can set yourself apart from competitors. One way to do that is by providing appealing visuals and high-quality imagery, but you need to ensure that they all meet Amazon image requirements.
From technical details to recommended quality settings, there are a few things to consider when setting up shop.
In this article, we’ll cover everything from image settings and categories to some good examples.
Let’s jump right in.
Table of Contents
What is the Recommended Amazon Image Size?
The ideal dimensions for Amazon product image are 2000 by 2000 px with an aspect ratio of 1:1. The accepted file formats are PNG, JPEG, Tiff (.tif), but the one that’s recommended is JPEG (JPG).
If the above requirements are not done correctly, Amazon will reject the image files.
These requirements include image quality, image size, file formats, etc. We’re going to discuss the recommended Amazon photo requirements below.
Technical Requirements for Product Images
Like any other platform, Amazon has product image requirements dimensions being one of them.
Your product image should have dimensions of 1000 pixels or more in width or height. Although Amazon image dimension for the longest side is 500 pixels minimum and 10,000 pixels maximum.
Amazon also has a feature for maximum zoom or a 5:1 aspect ratio, but for that, your image should at least have 1000 pixels on the side and 500 pixels on the shortest. But using a 1:1 aspect ratio for square images with the dimensions of 2000×2000 is recommended.
You have several options for your Amazon image file formats such as PNG, JPEG, Tiff (.tif), or gif (.gif) files, but the one that’s recommended is JPEG (JPG). GIF is an allowed file type but Amazon does not support animated GIF images.
The maximum file size allowed for each product image is 10MB.
If your file exceeds the recommended size, you can simply compress the image to meet Amazon’s image requirement without compromising the quality. You can also use either the sRGB or CMYK color mode.
Another technical requirement for Amazon is that file names must consist of a product identifier (Amazon ASIN, 13-digit ISBN, EAN, JAN, or UPC) followed by a period and the appropriate file extension (Example: B000123456.jpg or 0237425673485.tif)
An important thing to note is that spaces, dashes, or additional characters in the file name will prevent your image from going online.
How to Design Product Images for Amazon Listings
Once you’re done with the product photography, you can get creative with the product images to give them an enhanced look and feel. This helps your buyers get a better understanding of what the product is all about.
It also helps them imagine how they could use your product once they’ve bought it.
Below, we’ll talk about how you can design your product images, step by step, in a professional way.
There are a lot of tools available on the market today. One way to edit is with tools such as Adobe Photoshop, Lightroom, etc.
However, there’s another easier and efficient way to design product images that don’t require you to spend hours learning how to do it or download any software. You can simply get started with Pixelied.
Below, I’ll show you how can edit your images with Pixelied in an effortless way:
Step 1 – Open Pixelied’s Editor
To get started, simply go to our free Pixelied editor.
You can create a product image from scratch or choose from our hundreds of ready-made eCommerce hero image templates.
![]()
Step 2 – Customize Your Product Image
You can select from a wide range of eCom templates from multiple niches. After the template has been loaded, you can customize it your liking using stock photos, icons, background remover tool, mockups and much more.
![]()
Step 3 – Edit Your Picture or Add Elements
Once you’re ready to get started on your product images, you could add text, captions or effects. You can also add additional objects such as sale tags too.
![]()
Step 4 – Download
Finally, when you are done editing your product images and are happy with the results, it’s time to select the preferred format (which would be JPEG) and download high-quality images. The download button is in the top right corner. Take a look at the example below:
![]()
All that is left is uploading your product details and image on your Amazon store and you’re all set!
Best Practices for Designing Amazon Product Images
With the technical Amazon image requirements out of the way, there are certain best-practices that can further enhance the shopping experience for your buyers.
Keep in mind that even if you don’t follow these tips, you can still upload your product images to Amazon.
Let’s take a look:
1. Add Multiple Product Images
Amazon gives you the option to upload multiple images for one product.
You get the option to upload a main image, along with some supporting images and a video. Here’s an example:
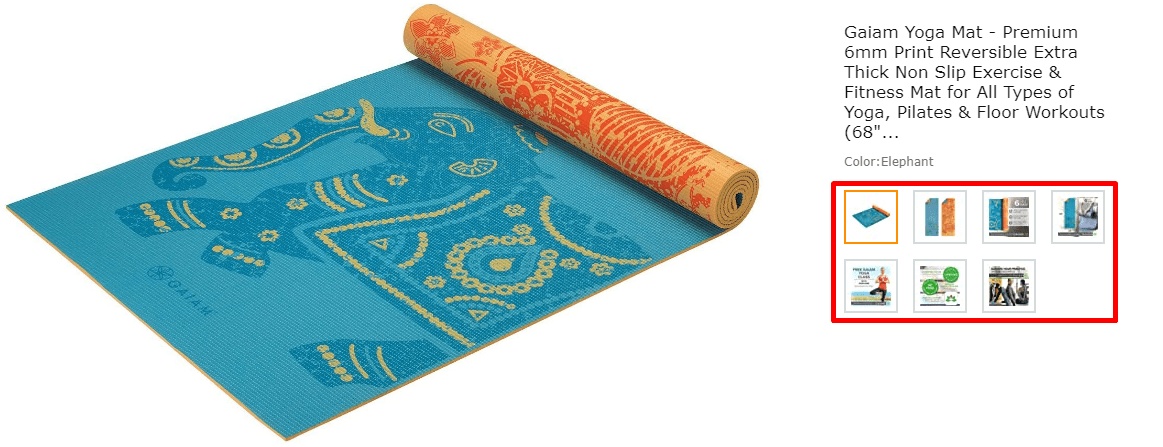
Having just a single image may create doubts and increase your shopping cart abandonment rate.
Remember – your goal as a seller is to help out your buyers in the best way possible. Sharing images that feature your product from various angles and in different scenarios can help answer a lot of questions for the buyer.
2. Use Large Enough Images for Zooming
A key feature of Amazon’s user-interface is that it allows you to zoom in on an image without clicking on it.
Simply hover your cursor over the image and it’ll display a zoomed-in image towards the right, like so:
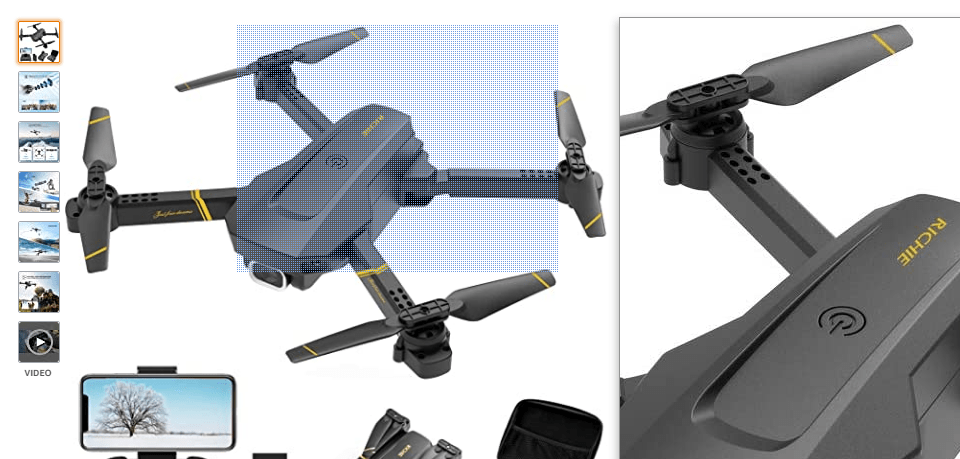
This feature allows the shoppers to closely inspect the appearance, components, and other elements of the product in consideration.
However, in order for this zoom-in effect to work, your image needs to be large.
Anywhere from 1,000 x 1000 px (standard Amazon image requirements) and 2,500 x 2,500 px is fine. You can use bigger dimensions, as long as the file size doesn’t exceed 10MB.
Also, make sure that your product covers a significant portion of your image.
3. Incorporate Important Information in Your Images
Using just plain images – that only show your product from different angles – is a rookie mistake.
Sellers should make the most of the fact that Amazon gives the option to upload multiple images,
A great way to utilize some of these images is to include some additional information about your product that the buyer could really use.
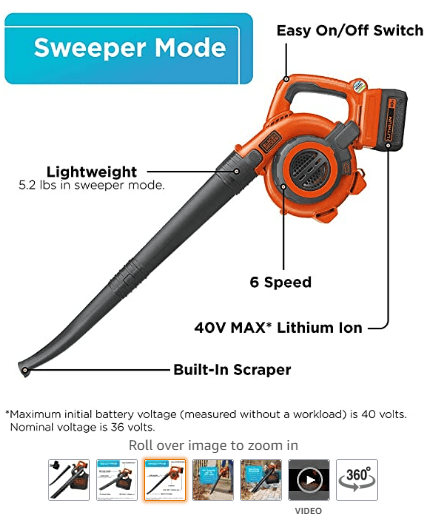
In the example above, the seller has highlighted some of the key features and capabilities of the product they’re selling.
You can also use this opportunity to share some precautions and fun-facts (how many countries it’s sold to, where it’s made, etc.) with the buyer.
Share anything that brings them one step closer to converting.
In addition, this tactic can also help with customer support. If you answer all the important questions in your supporting product images, you won’t have to cater to potentially hundreds of queries.
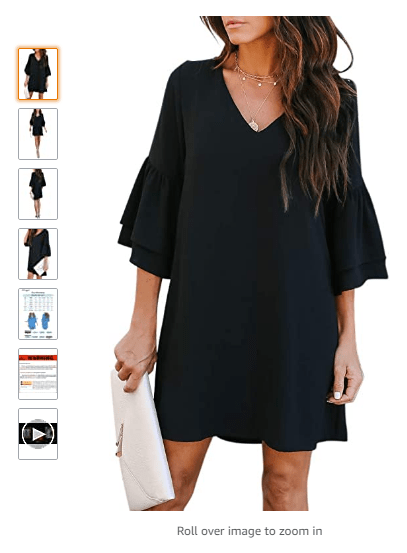
4. Specify the Priority of Your Images
Amazon lets you specify (and rearrange) the order of your product images.
In simple words, you can decide which images your buyers see first.
That way, you can create full-fledged experiences for your buyers, taking them through a journey that introduces your product.
A good practice is to share the main image first, a few images that show your product from different angles, and finally an image or two that shares additional information.
5. Show Your Product in Action
Finally, make sure that you include an image or two that shows your product in action.
This is a psychological tactic. Seeing the product in use, your buyers can envision themselves using it themselves.
Furthermore, depending on the type of product, it can show how easy-to-use it is.
How Amazon Product Images Influence Rankings
Everyone’s trying to compete to rank #1 on any platform. The same goes for Amazon, and there’s a good reason for that. It boosts your credibility and increases the chances of you being seen first.
Just like Google, Amazon also incorporates click-through rates (CTR) and conversion rate (CR) into a ranking algorithm. It depends on how many people click and purchase your product, and Amazon’s (A9 ranking algorithm) will rank your products higher in search results.
Your click-through and conversion rates have a direct effect on your product’s ranking. You can get a higher amount of click-through rate by inserting high-quality images. It will help boost your conversion rankings on Amazon.
You can also use optimization for your product listings with Amazon SEO tools, and track keyword rankings along with finding new ones. For more information go here.
Conclusion
It can be hard to follow all the technicalities, especially when you don’t know what they are.
Luckily for you, you now know the basic Amazon image requirements. Keeping all the recommendations in mind, and working around them accordingly, you can now establish your Amazon store successfully.
With so much competition and everyone running to rank the highest on search results, who knew a product image could play such a big role.
Things like Amazon image requirements and Shopify image sizes matter when selling online. And it’s best to stay ahead of the fold.
Happy Selling!


