
Your Shopify image is the welcome mat you lay outside your eCommerce doorstep. How you present it can make or break your chances of selling. But the most important aspect is getting the Shopify image sizes right.
Imagine a doormat the size of a tic tac on your porch. It’s so small that you can actually see the individual threads being spread open. That’s what happens when you upload an image that is too small as your Shopify store’s cover.
The same is true if it’s a large, high-resolution image. When compressed, large images become too dense (or may not even upload).
After you’ve chosen an image, it’s important that you resize it as well so as to make it more user-friendly and compatible with your online store page.
In this post, we’ll look at the importance of product image sizes, the ideal image optimization specs for Shopify, as well as how to resize images for the site.
Let’s get into it.
Table of Contents
What are the Ideal Shopify Image Sizes?
The ideal Shopify image sizes are 2048 x 2048 pixels (square product photos). However, Shopify image sizes can go up to 4472 x 4472 pixels but it’s not recommended.
When choosing the right product images for Shopify, it’s important to consider the width of the image first, followed by the height.
This is because when you upload an image that isn’t wide enough, Shopify automatically stretches it out to make sure it fills the placeholder.
This might lead to a pixelated photo on your homage.
On the other hand, if you upload a photo that’s too wide, Shopify will compress it and ruin the image’s aspect ratio.
When looking for a product image to upload, make sure it’s large enough for users to zoom in without pixelating. At the same time, it shouldn’t be such a large file size that it increases load times.
It is important to mention that each platform such as Amazon product images has its own size dimensions and guidelines.
Other Rules for Shopify Image Sizes
In order to let your audience zoom into your image, you need to keep your image above 800 x 800 pixels.
You can’t upload a product image larger than 20 MB, but we don’t recommend going above the 10MB mark anyway.
The best image you can upload on your website ranges from a few KBs to a maximum of 3.4 to 3.7 MB.
You should try to make a point of keeping your images no less than 72 ppi or preferably over 100 ppi.
Here’s a table that should give you a good idea of how large your Shopify image sizes must be for their respective purposes.
| Purpose | Size (Pixels) | Type |
| Favicon | 32 x 32 | PNG |
| Logo (Main menu) | 720 x 100 | JPG/PNG |
| Banner | 1600 x 600 | JPG |
| Promotions (Featured) | 840 x 840 | JPG |
| Collection | 1024 x 1024 | JPG |
| Slideshows | 1600 x 600 | JPG |
| Gallery | 800 x 800 | JPG |
| Product Image | 1024 x 1024 | JPG |
| Blog/Article Image | 1800 x 600 | JPG |
That said, you might look at an image and see how it’s not as sharp or good quality as when it’s on the phone screen.
In this case, you will need to scale the image or optimize it.
Before you do, though, make sure you know the scaling vs resizing difference.
Design Awesome Images Using Shopify Image Sizes on Pixelied
There are a ton of tools that you can use to refine and design product images according to the Shopify theme.
These include Photoshop, Canva, and more.
However, almost all of them require training and experience in photo manipulation for you to be able to use them.
Pixelied is a user-friendly alternative to all these tools and software with a humanistic layout.
Everything is laid out right in front of you – from the smallest of tools, all the way to important information you need to edit the image.
You don’t need any training to master Pixelied, either.
Here’s a detailed outline of what you need to do to create, design, and optimize your product image.
Step 1: Head Over to the Editor
To get started, simply head over to our free editor.
In the left sidebar, you can go through all the eCommerce hero image templates that are ready to use and customize.
![]()
On the left, you have a selection of templates to choose from.
![]()
You can also search for something specific or change the category via the drop-down menu.
Click on a template. It should load immediately.
At the top you will have the details about your product image, specifically:
- Background color, borders, shadows, and opacity
- Alignment, layers, and positioning options
- Size, flip, and lock options
And more.
Select any element in the template to enable these buttons.
Once you click an element, you may see more or fewer options as well. Hover your mouse over the eyedropper button to see what it does.
Step 2: Design Away
Now that you know the ins and outs of the editor, it is time to start designing something on your own.
Let’s say you want to create an image for motorcycle decals.
Select an appropriate template.

You can change the color scheme if you want by simply clicking on the blend thumbnail on your left and choosing a blend of your liking, as shown below.

To edit the text, double-click the placeholder.

Click on any element and you’ll see a handle protrude upwards. Click on it to tilt the image or simply drag and drop the same to move it around.

You can add more text or replace the image, as well as change the background, color schemes, and much more to come up with the final image.
The sky’s the limit when it comes to customizing your custom image.
Now, zoom out with the help of the button at the bottom.

You will be able to resize the whole image from here.

This is where you can change your background’s orientation and size from. Make tweaks and finalize the image before moving on.
Step 3: Download Using Shopify Image Sizes
Once you have finalized your design, click on the Download button at the top right corner.
![]()
You will see a dropdown that lets you choose the file type (image format) (jpg, png, webp, and more), quality, and size of the image you just designed. 80% or even sliding it down to 50% or 40% would be enough to maintain Shopify image sizes.
By choosing the quality, you are simply scaling the image down, not ruining the pixels or ppi. It actually has a direct bearing on the file size as well.
Tips When Designing and Using Shopify Images
Shopify images are a vital part of marketing design.
That’s all the more reason to do it right.
Ideal Shopify image sizes aside, here are some actionable tips to help you design awesome images:
1. Make Sure Your Product is Visible
All eyes should be on your product. This is actually a very common mistake designers make – adding too many elements into the mix and effectively distracting the viewers.
The product photo should be exactly that, a PRODUCT photo.
You can include contrast elements to highlight your product as shown in the screenshot below.

Or, if you want to match the product’s color with the background, you can choose to keep the poster clutter-free as shown below.

As you can see, it includes all the information one might need but the watch is still the highlight.
2. Ensure That the Color Goes with Your Brand Guidelines
The two examples above both have different designs, are different types of images, and showcase a different group of products.
However, what they both have in common is that they match the brand color.
Anne Klein, for instance, follows a black aesthetic. However, that’s just the brand.
Of course, there are watches of different colors. However, you will find that almost every product image, Facebook ad, and thumbnail follows the same branding principle.
The text overlay offers some flexibility.
That’s what the template uses to match the watch’s undertones.
3. Use Different Images Showing Your Product from Different Angles
When creating the perfect Shopify image for your product, it is a good idea to show the product from different angles – but in different images.
Showcasing the same product over and over again in the same image, albeit from different angles, introduces clutter.
And as you continue to add more and more elements into the mix, you will inevitably increase the file size as well.
You’ll have to scale it down later on.
If you are trying to showcase a group of products, you don’t have to name all of them. You can actually add a couple of them as shown in the image below.

The main objective you should keep in mind is that under no circumstances should there be any clutter on your product or banner images.
4. Compress the File Size of Your Images
Once you’ve finalized the design, you will need to compress the file size of your image to minimize loading times, all while making sure the product image stays high-quality.
This is known as image optimization.
Pixelied lets you change the image size and quality of the image before you download it.
It also lets you choose the format.
For example, you can choose JPEG and download it by choosing a 5x image size and 10’ image quality, or 1x image size with 5-8’ image quality.
While the former is suitable for printing, the latter is geared towards Facebook Ads, Shopify, your website, and other online platforms where loading time is important.
5. Always Test Your Image
After you’ve downloaded the image and added it to your website, don’t forget to test the image loading speed and visual quality.
First, conduct a visual inspection. Load the page and see if it loads properly. Inspect the borders and then move in to make sure the alignment with headers is perfect.
Make sure the image isn’t pixelated. Try zooming in to see how far you can go.
Next comes the loading time.
Usually, the uploading time itself gives you a hint of how long it will take to download the image every time a new visitor comes to your store.
On average, it takes seven times longer to upload an image than download it.
However, there is a better way to know for sure where you stand:
- Load your page.
- Press Ctrl + Shift + C.
- The console will open.
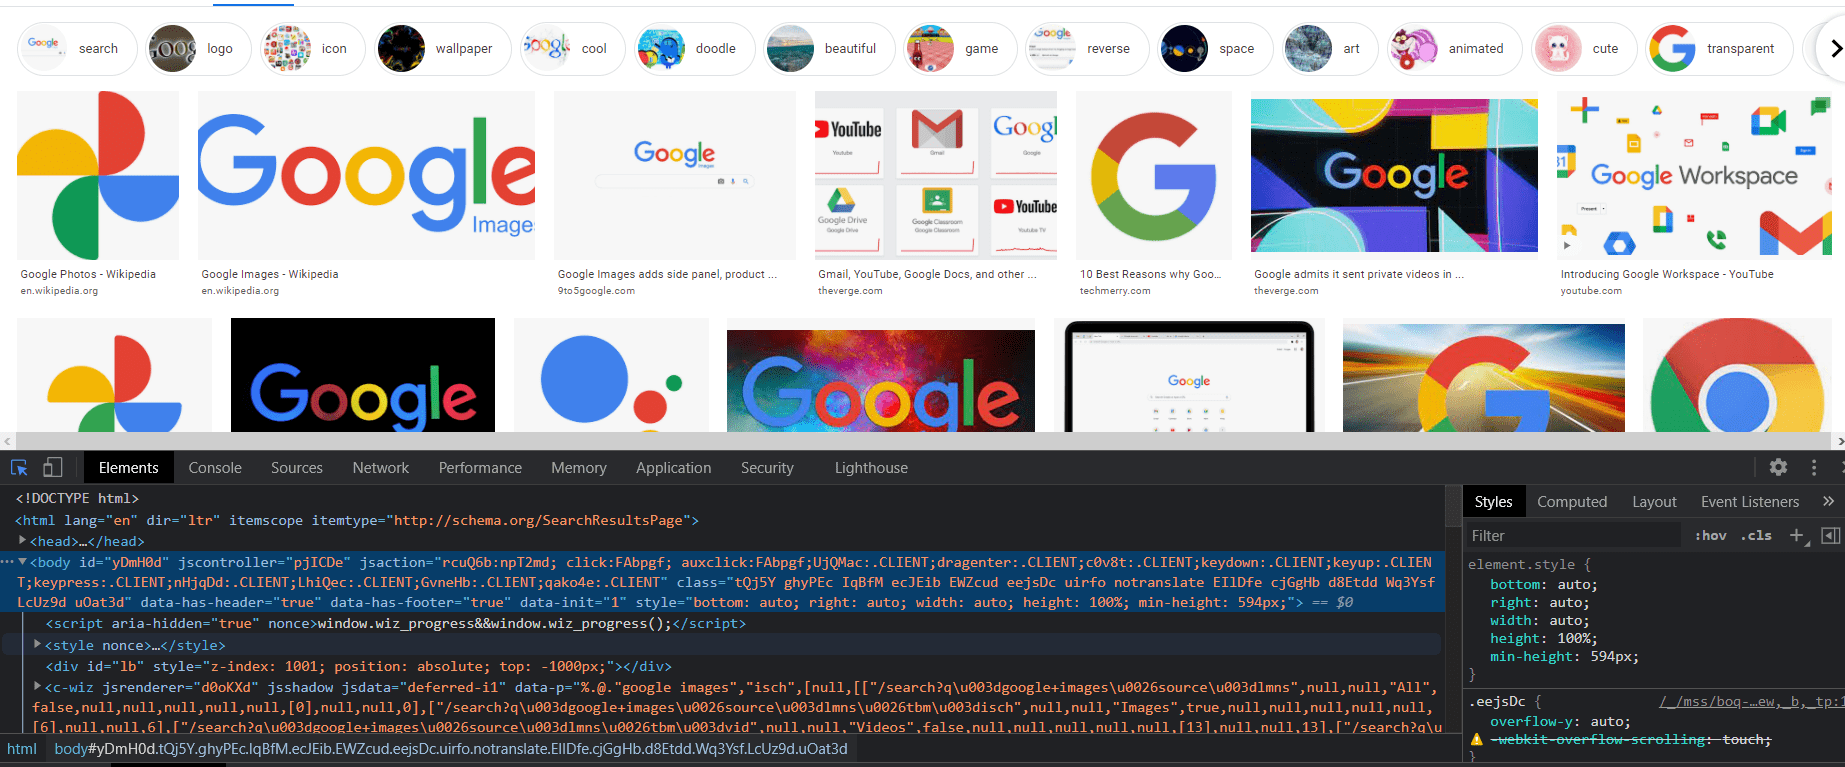
- Click on the Network.

- Press Ctrl + Shift + R to hard reset your page.
You will see in red (or green) the loading time of your page along with other important metrics. The recommended page loading time is under 2 seconds.
Final Thoughts
Ideal Shopify image sizes aside, there’s a lot that goes into designing an effective visual. This includes picture quality, good copy, and an overall reliable presence.
However, at the end of the day, the goal is to improve user experience, and Pixelied can definitely help get the visual aspect down.
Use Pixelied to get the right-sized and perfectly designed images FOR FREE today and give your store the edge it needs.

Informative and well written! Thanks to Talha for sharing these useful guidelines and tips for using images in Shopify. Please make a guide for using images on WordPress also.
Hey Fred! We’re glad the size guide has helped you.
For WordPress size guide here is our detailed post:
https://pixelied.com/blog/wordpress-featured-image-size/